- Home
- Symmetry Blog
- Wireless Communication Range Testing with Digi
From Digi: Wireless Communication Range Testing with Digi XCTU

About Symmetry Electronics
Established in 1998, Symmetry Electronics, a Division of Braemac, is a global distributor of electronic components and systems. Combining premier components and comprehensive value-added services with an expert in-house engineering team, Symmetry supports engineers in the design, development, and deployment of a broad range of connected technologies.
Exponential Technology Group Member
Acquired by Berkshire Hathaway company TTI, Inc. in 2017, Symmetry Electronics is a proud Exponential Technology Group (XTG) member. A collection of specialty semiconductor distributors and engineering design firms, XTG stands alongside industry leaders TTI Inc., Mouser Electronics, and Sager Electronics. Together, we provide a united global supply chain solution with the shared mission of simplifying engineering, offering affordable technologies, and assisting engineers in accelerating time to market. For more information about XTG, visit www.xponentialgroup.com.
Welcome to our series on the Digi XCTU® tool for configuring and testing Digi XBee® devices. Here are the previous posts in this series:
- Top 12 Digi XBee Management Tools in Free Digi XCTU
- Measure Digi XBee Network Throughput with Digi XCTU
- Device Configuration Made Easy with Digi XCTU – Managing Digi XBee Networks
- Manage Digi XBee Networks Wirelessly with Digi XCTU
- Map Your Digi XBee IoT Network with Digi XCTU
- Wireless Configuration with the Digi XBee Mobile App – XCTU for Mobile
This post talks about how to use Digi XCTU to test your wireless communication range.
How to Range Test Digi XBee Nodes with Digi XCTU
In wireless communications, predicting the quality of long-distance links before installing an IoT system can be critical. For example, in oil and gas monitoring applications, a radio connection may have to span several kilometers from on-site equipment to a central monitoring station. The longest distance over which two radios can effectively communicate is called their range.
It’s crucial to know whether your chosen solution will work before heading across the tundra to deploy it. Digi’s XCTU application provides the automated and graphical tools needed for full loopback range testing of your entire system including the antennas and cabling. Once on-site, local environmental factors can be included in your predictions. Want to know if your Digi XBees will go the distance? Digi XCTU gives you peace of mind.
In wireless communications, predicting link quality before installing your IoT network is critical, as a radio connection may have to span several kilometers. Digi XCTU lets you range test prior to deployment. Read more: https://ctt.ec/8Balg+ #ConnectWithConfidence
Parts Required
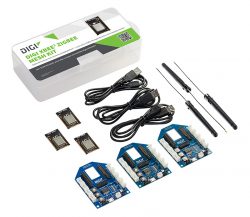 One Digi XBee3 Zigbee Mesh Kit, containing:
- 3 Digi XBee3 Zigbee modules
- 3 Grove evaluation boards
- 3 USB cables
- A laptop or desktop computer
- XCTU (free download)
NOTE: These instructions will work with many models of XBee radios including Zigbee, 802.15.4, DigiMesh, and sub-GHz Digi XBees.
Basic Setup
Begin by following the instructions in the XCTU Configuration article to:
- Download Digi XCTU.
- Connect a Digi XBee3 to your computer with a Grove evaluation board.
- Open XCTU and click Add Device to connect to the XBee3:

Configure a Local XBee
Next, configure the locally-connected Digi XBee3 to be a coordinator in API mode. For a complete walkthrough of this process see our Manage XBee Networks Wirelessly with XCTU article. The basic steps are:
- Change the CE Device Role to “Form Network [1]”. Click the pencil icon to write your change to the firmware.
- Optionally, change the setting for AP API Enable to be “API Mode With Escapes [2]”. This isn’t required for range testing although it will make some operations faster.
- Optionally, you can change NJ Node Join Time to be FF which is a special setting that removes all join time limits.
Assemble the Network Hardware
Assemble and power a remote Digi XBee3. It can be mounted on an evaluation board, then connected to a USB power source. If you use a USB battery, you can move your remote XBee3 around during the range test. By factory default, Digi XBee3 Zigbee modules will join any available network, so we don’t need to configure them for this example.
Access Remote Digi XBee Devices
To range test your wireless network, XCTU needs to know about at least one remote XBee3 radio. Click the network icon displayed with the local radio module on the right side of its box, shown circled in red here.

Range Testing with Digi XCTU
Once you’ve added your local radio and discovered at least one remote XBee in XCTU, you’re ready to do some range testing. This is a very straightforward procedure.
- Begin by choosing the Range Test option from the Tools menu.

- The Radio Range Test window is displayed, including the Device Selection section at the top and the Range Test graphs below it.
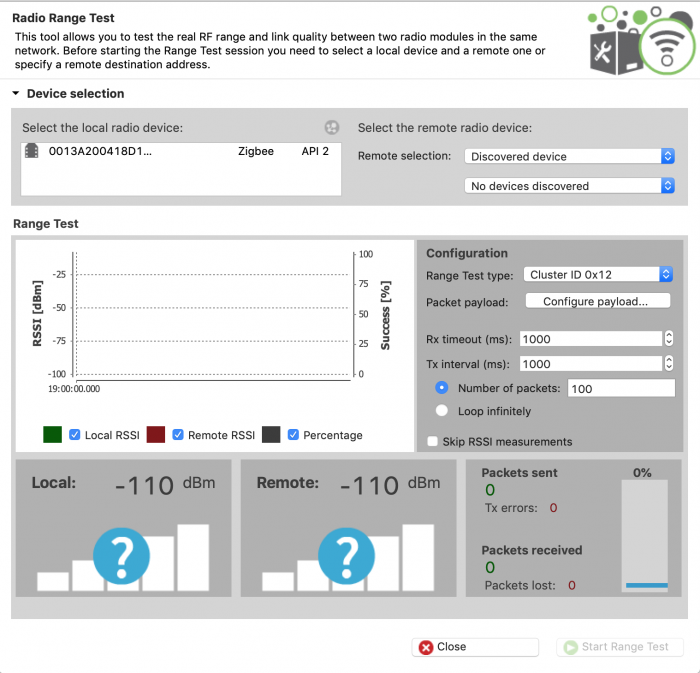
- In the Device Selection area, select the local radio and then choose one of the discovered remote radios as shown.

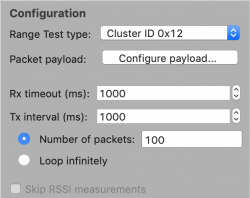
- For this first test we’ll go with the default settings, using Cluster ID 0x12 to set loopback on the remote XBee Zigbee radio module and sending 100 packets with a 1-second (1000ms) delay.
 NOTE: For non-Zigbee devices, you may need to use a hardware loopback jumper, connecting the RX to the TX pin on the remote radio so that anything received is immediately transmitted back in AT mode. For protocols that support cluster 0x12, this loopback is done automatically for you in software.
 - Begin the range test by clicking Start Range Test as shown. XCTU will begin sending packets and measuring the signal strength on those that are returned.
- All the data is displayed in graphs, including the current local and remote Received Signal Strength Indicator (RSSI), the number of packets sent and received, and a line graph that shows all these values over time.
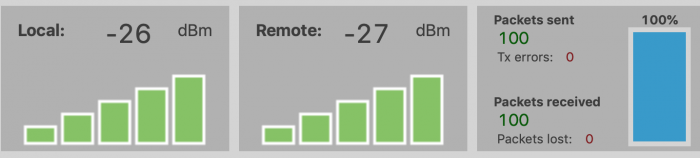
- The line graph is probably the most useful section, especially if you are moving the remote radio during the test, because you can see all the changes. In general, as you move farther way the signal strength will decrease while the percentage received will stay high. At some point you will begin to lose signal and the percentage received will begin to dip as the RSSI drops near -100 dBm. Bringing the radios closer together will restore connectivity and improve the RSSI.


Live Test
Here’s a video that shows the entire process of range testing with Digi XCTU. At the beginning, the local and remote radios are very close together. Then, as they are moved farther apart you will see RSSI reduced and eventually some lost packets. When they are moved back together, packet loss stops and signal strength returns to useful levels.
Why Wireless Range Testing Makes Sense
Understanding the quality and reliability of long-distance wireless connections means testing the longest distance over which two radios can effectively communicate. Digi’s XCTU application provides automated, graphical tools for complete range testing. It creates graphs that show how radio performance changes over time and distance.
In a very practical sense, you can use Digi XCTU to prepare for an IoT deployment:
- You can predict loss of signal range, then ensure all nodes are within that distance of each other, with a safety margin.
- You can test how much signal is being absorbed by a wall, a building, a custom device enclosure, or hilly terrain.
- And you can compare performance at different frequencies, or with different protocols for best reliability and range.
Digi XCTU gives you many empirical tools for designing your network, and the real-world results to back up your decisions for peace of mind.
Source: https://www.digi.com/blog/wireless-communication-range-testing-with-digi-xctu/
Looking to integrate Digi products with your design? Our Applications Engineers offer free design and technical help for your latest designs. Contact us today!
About Symmetry Electronics
Established in 1998, Symmetry Electronics, a Division of Braemac, is a global distributor of electronic components and systems. Combining premier components and comprehensive value-added services with an expert in-house engineering team, Symmetry supports engineers in the design, development, and deployment of a broad range of connected technologies.
Exponential Technology Group Member
Acquired by Berkshire Hathaway company TTI, Inc. in 2017, Symmetry Electronics is a proud Exponential Technology Group (XTG) member. A collection of specialty semiconductor distributors and engineering design firms, XTG stands alongside industry leaders TTI Inc., Mouser Electronics, and Sager Electronics. Together, we provide a united global supply chain solution with the shared mission of simplifying engineering, offering affordable technologies, and assisting engineers in accelerating time to market. For more information about XTG, visit www.xponentialgroup.com.