- Home
- Symmetry Blog
- From Silicon Labs: ProtoBricks Brings LEGOs into the Digital Age with Gecko MCUs
From Silicon Labs: ProtoBricks Brings LEGOs into the Digital Age with Gecko MCUs

About Symmetry Electronics
Established in 1998, Symmetry Electronics, a Division of Braemac, is a global distributor of electronic components and systems. Combining premier components and comprehensive value-added services with an expert in-house engineering team, Symmetry supports engineers in the design, development, and deployment of a broad range of connected technologies.
Exponential Technology Group Member
Acquired by Berkshire Hathaway company TTI, Inc. in 2017, Symmetry Electronics is a proud Exponential Technology Group (XTG) member. A collection of specialty semiconductor distributors and engineering design firms, XTG stands alongside industry leaders TTI Inc., Mouser Electronics, and Sager Electronics. Together, we provide a united global supply chain solution with the shared mission of simplifying engineering, offering affordable technologies, and assisting engineers in accelerating time to market. For more information about XTG, visit www.xponentialgroup.com.
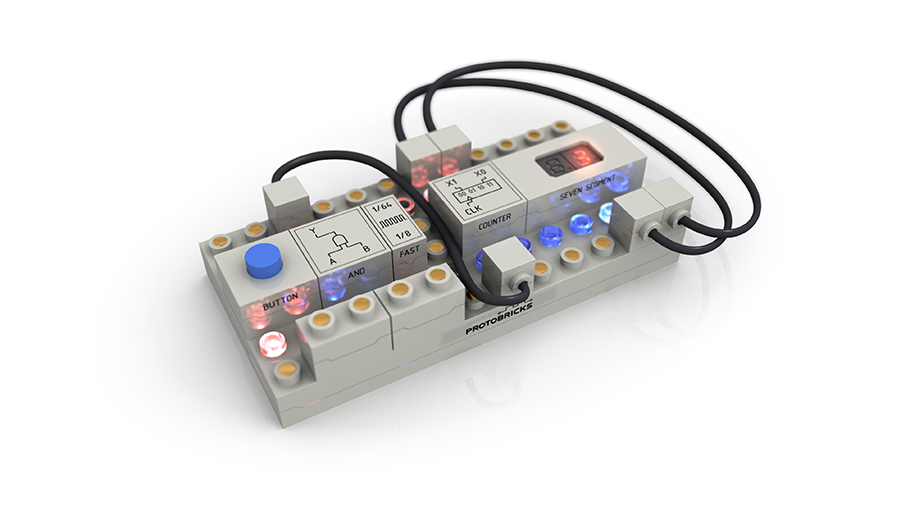
ProtoBricks, a unique circuit-building toy in a LEGO-compatible form factor, is now live.
This has been a 6-year labor of love for me, the inventor, as I struggled to turn an idea into a hobby and finally into a real product. Today I’d like to focus on the heart of the product, the “hub”, and how Silicon Labs microcontrollers became the center of the ProtoBricks electronics universe.
Functional Requirements
The ProtoBricks Hub is a 12x6 stud LEGO™ sized brick with a grid of electrical contacts and LEDs on the top. We put a full-height two layer PCB board inside the brick. The bottom of the board has four spring loaded pin contacts: Power, Gnd, UART TX, UART RX, plus bare-board contacts for programming. The top is where the magic is; the edge contacts (studs) are the IO pins for the circuit. There are also two rows of RGB LEDs (one for each IO pin). Finally, one of center rows needs to do most of the heavy lifting: measure resistance/voltage, send/receive UART messages and switch between these tasks at a moment’s notice. This has gone through many iterations to squeeze out the optimal form factor, functionality and cost. Now we just need a microcontroller that is up to the task.
Wanted: A Very Capable Microcontroller
Breaking down the requirements further I needed to select a microcontroller with at least two UARTs. One of them needs to handle TX and RX flipped at different times. I needed at least 35 or so GPIOs pins to handle the exposed IO on the brick and service the other chips on the board. I also needed to light 24 RGB LEDs in three banks with varying intensity. Finally, I needed an accurate and quick ADC for detecting bricks via precision resistors and computing potentiometer positions.
I also needed a way to program the boards in the field and a way to easily debug without completely taking them apart.
Performance wise, everything has to work with many of the microcontroller peripherals turning enabled, disabled, started and stopped at the granularity of 100us. I set a hard deadline to service my main circuit emulating loop at a target rate of 1KHz. The most time consuming development task was organizing and breaking down the tasks into small, stateful chunks that could be prioritized properly. Fortunately for me I have been a PC C++ developer for 20 years and always enjoyed writing lower level code and optimizing tight loops – how hard can it be?
In the end, I chose Silicon Labs’ EFM32G232 with 128KB of flash, 16KB RAM. It had the right balance of IO pins, USARTs, a good ADC, and a reasonable price.

Inside the hub brick
Here’s a few of the highlights, features, and tricks I learned along the way:
World’s First Brick Compatible Debug Connector
We wanted to provide power, UART and microcontroller programming pins in a very compact 2x2 stud size footprint , so I built this board with a 3D printed enclosure. Now I can connect to my boards in style and without taking apart my bricks every time. The pogo pins pointing up connect to SWCLK, SWDIO, SWO, and RESET.

Debug bricks: the center 4 pogo pins connect to the microcontroller

Prototype from last year, debugging the hub microcontroller using the Gecko development board.
UART Tricks
One of the UARTs needs to be flipped from RX to TX depending on the brick position left to right. To do this I wired directly to the same UART peripheral but using two different pinout locations. Using the alternate location flag I could flip the UART without any external hardware or busing. Every penny counts with consumer electronics. Brick-to-brick communication uses 115 KBps UART without an external crystal. No problems here. I tested pushing that up to 1Mbps which worked most of the time, but I think this was more an issue with my board design than anything the microcontroller could handle.
Peripheral Switching
The center row of many functions (voltage reader, resistance reader, UART communicator) ended up being serviced via two low-ohmic analog multiplexers (IDTQS3VH251) which then fed into the microcontroller’s UART and ADC pins. Everything was then time multiplexed on the microcontroller very quickly – turning on/off the ADC, UART, internal voltage dividers, addressing the MUXes. The EFM32 was up to the task: very fast at enabling/disabling peripherals and never getting into some weird state or timing issue. This saved me tons of time, board space and cost compared to dedicating more hardware! The only issues I had were of my own making. I needed to write a fairly sophisticated scheduler in firmware to service all the bricks optimally.


Pumping out the data
While all this is happening I still need to service the LEDs quickly. This was done using the final USART block available configured as SPI. Here I am just shifting out the data over DMA as fast as I can (bursting 96 bits at a time at a rate of 1 Mbps) to a chain of constant current LED drivers. At the same time, I needed to turn on and off PMOS transistors to power the 3 banks of LEDs, all time-multiplexed. Everything had to refresh very quickly because I wanted control the intensity of each LED via PWM.
In the end, I was trying to refresh 32-levels of intensity 200 Hz for 3 banks (3*32*200) = 19200 Hz with some custom GPIO bit flipping all in an interrupt handler! It held on, but barely. This was starting pushing the limits of what was possible with this design. I think if I had added an extra shift register or offloaded servicing the entire LED calculation/bitshifting effort to a tiny microcontroller (EFM8 Busy Bee?) I could get it to what I really want, 8-bit intensity levels and faster than 200 Hz multiplexing. Life is full of tradeoffs.
For LED blinking light lovers out there, 200 Hz is really too slow for LED multiplexing. You don’t notice it at first, but there are beating (stroboscopic effect) problems at this rate: especially with cameras. We had a video shoot last month and after some early testing decided to sacrifice most of the intensity levels for a faster overall refresh (500-600 Hz). We have one video shot where two cars go down a race and run a simple lockout circuit. 600 Hz LED refresh is a tad too slow when doing slow motion capture, but fine for realtime video.

Compiler and toolchain support
I can report after writing many thousands of lines of code the compiler never generated the wrong output. YMMV, but I found the compiler and debugger to be very robust. I as able to breakpoint and probe variables and stack frames inside of and out of interrupts without issue and very quickly. This sped up my development time considerably towards the end of the project. Very solid. I am still using Simplicity Studio 3 because I did not want to rock the boat with my toolchain towards the end of my prototyping. I am excited to see what 4.0 has to offer.
C++ Support
After starting in the firmware in C, I longed for just a modest amount of C++isms. Function pointers in structs are great and all, but after passing around essentially a “this” pointer at the beginning of many of my functions, things started getting quite verbose.
Fortunately for me, Simplicity studio added C++ support and I never looked back. Just writing interface pointers so I could pass around some of the high-level blocks reduced the coding task considerably without much of a runtime hit. I could even call a few C++ objects within some of my interrupt code without a problem. Nerd note: For the first time in my career, I wrote a placement new operator! That was fun. I never needed a malloc or any dynamic memory to get the job done.
Floating point
There were a few places where it was very helpful to do a floating point divide or multiply (my own ADC calibration process for instance). Since I was using the ARM M3 core, it does not have a floating point unit, but the software-generated one worked just fine. I’ve kept an eye on the code size - it didn’t add too much (I’m at 90K of compiled code right now). If need be, I could drop back to fixed point math.
In the end I am happy to report Silicon Labs MCUs and software suite was very much up to the task and rarely caused me problems during development (I had to restart the software a few times, but that’s minor compared to my real issues). I was able to focus my energy on building my product, pushing the hardware to its limits, and dealing with other challenges which there were plenty!
If you are interested in teaching kids about digital logic in a hands-on and fun way – then check out ProtoBricks’ Indiegogo campaign starting August 15th, and if you want to see how I did it we will release all the Silicon Labs firmware and board designs for anyone to hack or modify.


About Symmetry Electronics
Established in 1998, Symmetry Electronics, a Division of Braemac, is a global distributor of electronic components and systems. Combining premier components and comprehensive value-added services with an expert in-house engineering team, Symmetry supports engineers in the design, development, and deployment of a broad range of connected technologies.
Exponential Technology Group Member
Acquired by Berkshire Hathaway company TTI, Inc. in 2017, Symmetry Electronics is a proud Exponential Technology Group (XTG) member. A collection of specialty semiconductor distributors and engineering design firms, XTG stands alongside industry leaders TTI Inc., Mouser Electronics, and Sager Electronics. Together, we provide a united global supply chain solution with the shared mission of simplifying engineering, offering affordable technologies, and assisting engineers in accelerating time to market. For more information about XTG, visit www.xponentialgroup.com.