- Home
- Symmetry Blog
- Manage Digi XBee Networks Wirelessly with XCTU
From Digi: Manage Digi XBee Networks Wirelessly with XCTU
About Symmetry Electronics
Established in 1998, Symmetry Electronics, a Division of Braemac, is a global distributor of electronic components and systems. Combining premier components and comprehensive value-added services with an expert in-house engineering team, Symmetry supports engineers in the design, development, and deployment of a broad range of connected technologies.
Exponential Technology Group Member
Acquired by Berkshire Hathaway company TTI, Inc. in 2017, Symmetry Electronics is a proud Exponential Technology Group (XTG) member. A collection of specialty semiconductor distributors and engineering design firms, XTG stands alongside industry leaders TTI Inc., Mouser Electronics, and Sager Electronics. Together, we provide a united global supply chain solution with the shared mission of simplifying engineering, offering affordable technologies, and assisting engineers in accelerating time to market. For more information about XTG, visit www.xponentialgroup.com.
IoT environments are more and more complex today, as the Internet of Things grows to encompass an enormous range of use cases, from smart cities and street lighting to industrial applications. In this series, we cover the features of Digi XCTU® that help you to manage and update your Digi XBee® devices and networks.
As we have described in previous posts, XCTU provides a suite of Digi XBee network management tools for performing critical tasks:
- Configure Digi XBee® devices
- Test the communication range between modules
- Program intelligent edge networking behaviors into your modules with MicroPython
- Map and visualize your networks
- Perform mass firmware updates
Digi XCTU puts you fully in charge of your Digi XBee® networks, wirelessly.
Manage Digi XBee Networks with XCTU
A single Digi XBee module at your computer provides secure access to networked radios over the air. Hundreds of Digi XBee modules are now at your fingertips. Even when they’re behind a locked door or way at the top of a utility pole, you’re securely in control. Configure, manage, map, and test any Digi XBee on your network without leaving your chair.
Using Digi XCTU over-the-air is virtually effortless. With one click you can scan all the Digi XBee devices on your network, then add them to the XCTU interface as a list or graphical map. Want to be the boss of your network? The best way to learn is hands-on, so gather your materials and let’s go through the steps to connect XCTU to remote Digi XBee modules.

Materials Needed
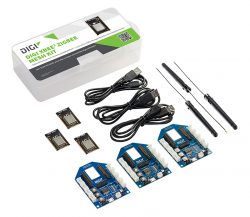
- One Digi XBee3 Zigbee Mesh Kit, contains:
- 3 Digi XBee3 Zigbee modules
- 3 Grove evaluation boards
- 3 USB cables
- A laptop or desktop computer
- Digi XCTU, available as a free download
Basic Configuration Setup in XCTU
Begin by following the instructions in the XCTU Configuration article to complete these steps:
- Download XCTU.
- Connect a Digi XBee module to your computer with a grove evaluation board or an XBIB board.
- Open XCTU and click Add Device to connect to the XBee:

Configure a Local XBee Module
First we will configure the connected Digi XBee for API mode.
Note: Plain-text serial port communications are the factory default for Digi XBee modules, but this human-readable protocol comes with significant limitations for computer automation. Therefore, Digi XBee modules also offer a frame-based protocol for structured machine communications, called API mode. In API mode all serial communications must be encoded in the correct frame structure, and this unlocks a rich, reliable communications protocol that’s perfect for advanced machine-to-machine messaging. For more information, see the Digi XCTU User Guide.
Enter API Mode
To use API mode, follow these steps:
- In XCTU, click the module you just added to the device list on the left. Its configuration will be displayed on the right.
- Scroll down to the UART Interface section and locate the AP API Enable setting. You can use the + and – buttons at the top of the right section to collapse and expand the configuration setting categories or search for the setting using its code, “AP”.
- Once you’ve located it, change the setting for API Enable to be “API Mode With Escapes [2]”.
- Click the pencil icon to write your change to the firmware.

Set up a Network Coordinator Node
All Zigbee networks must have one node acting as the coordinator to form the network. Most Zigbee networks in the field will already have an existing coordinator node. For this demonstration, we are creating a brand new network, so we will enable the currently connected node as the coordinator, as follows:
- At the configuration screen in XCTU, change CE Device Role to “Form Network [1]”.
- Click the pencil to write this change to the firmware.

Tip: By default, the coordinator limits the time in which new nodes are allowed to join the network to 254 seconds (about 4 minutes) after coordinator power-up. During evaluation and testing, it is often easier to allow unlimited joins. Therefore, you can optionally change NJ Node Join Time to be 255 which is a special setting that removes all time limits.

Assemble the Network Hardware
Assemble and power your two remote Digi XBee3 devices. Each should be mounted on an evaluation board, then connected to a USB power source. This can be your computer, or any USB battery or power adapter. By factory default, Digi XBee3 Zigbee modules will join any available network, so we don’t need to configure them at all for this example.
Note: Open networks are great for learning and experimentation. Real-world production networks should generally be secured and restricted. We’ll cover security briefly below.
Access Remote XBee Modules
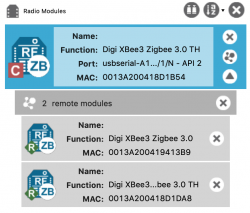
Now comes the magic. Click the network icon displayed with the local radio module on the right side of the box. It’s the middle icon shown here.
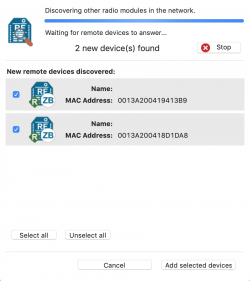
XCTU will now search the radio network associated with your local module for other Digi XBee devices on the same network. When it discovers them, it will add them to a list as shown.
Click Add selected devices to add those remote XBee modules to your collection of devices. They will be displayed right below your local module.
Configure Remote XBee Devices
Configuring a remote Digi XBee is very easy. Simply click one of the remote XBee devices now displayed on the left, and the familiar configuration screen will appear on the right. You’ll notice a bit more latency than with the local module. That confirms you are working live over-the-air with a module that’s not connected to your computer.
Everything works exactly the same. Let’s configure something on the remote XBee to prove it.
When you’re working with groups of modules, you can always tell them apart by the unique MAC address of each Digi XBee device. However those numbers are quite long and not easy to read. We can assign human-readable labels to all Digi XBee devices to more easily tell them apart.
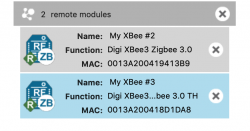
For example, you might assign the name “Living Room Sensor” or perhaps “Lobby Vending Machine” to tell a bit about where the module is and what it does. Set a label for each remote XBee using the NI (Node Identifier) setting in the Addressing section of XCTU. We used the names “My XBee #2” and “My XBee #3” but you can apply any text you like. Remember to use the pencil icon to save your changes.

Once you’ve added Node Indicator labels, those names will appear in list view, and will be displayed in various other interfaces when working with these radios.
Now you can configure any Digi XBee on your network. All settings are available and can be changed at any time.
Note: Since changing some settings can cause the XBee to leave the network, use a bit of extra caution when reconfiguring remote modules that you cannot physically access.
Use It!
Configuration is only the beginning. XCTU can also perform the following on remote Digi XBee devices:
- Firmware updates
- Range testing to determine real-world link distances
- Throughput testing to characterize network bandwidth
- Mapping to visualize and explore your network
>> Be sure to check this blog regularly, as we will continue to cover features such as these in future articles. You can also sign up for the Digi newsletter to get updates in your inbox.
Note: XBee Recovery, the MicroPython terminal, and the other consoles require a serial connection to a local Digi XBee module, so these features are not available when working with remote XBee devices.
Secure Your Digi XBee Network

Once a network is secured, access to remote devices must pass several security hurdles that prevent unauthorized access to your network. Anyone attempting to connect to secured remote XBee devices must:
- Know he channel and PAN ID of the network
- Know the pre-set encryption type and key
- Be allowed to join by the coordinator.
Here are some configuration settings that you can use to secure your Digi XBee network:
Encryption enable and set key (EE & KY): 

The join window is limited by NJ (254 seconds by default, set to FF for no limits):

Digi XCTU is the key to accessing inaccessible XBee devices. By joining the network through an XBee attached to your computer, you can securely access entire networks to perform maintenance, upgrades, testing, and exploration.
Be sure to check out our other blog posts in this series and stay tuned for more about the extensive network testing and management tools provided for remote Digi XBee modules.
Source: https://www.digi.com/blog/manage-digi-xbee-networks-wirelessly-with-xctu/


